How to Implement ePC-02

The Joint Commission has diverged from CMS and introduced a new eCQM – PC-02 (Cesarean Birth). We’ve had a lot of clients ask questions about this measure so in this blog I’ll walk you through how to read the specification, tips for mapping and things to watch out for.
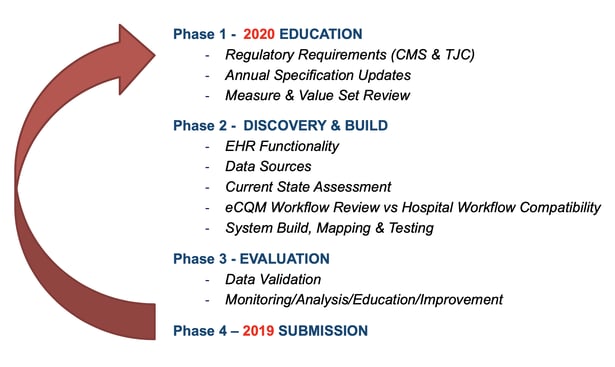
The Four Phases of eCQMs
Before I get into the details of the measure, I want to talk about the process for implementing eCQMs in general. I’ve shown this graphic in every webinar I present because it’s so important that you understand this flow to be successful with your eCQMs.
The first step is one of the most critical steps in my opinion. For measures that have been around for a while, this step may be quick. Essentially you review the specification (spec) for any changes and then modify any mapping or processes to account for those changes. If you are implementing a new eCQM you need to set aside time to thoroughly pull that spec apart and dissect it. Make sure you understand the intent, the rationale, the logic and the data elements and codes, which I’ve helped you with below.
When Beginning to Implement a New eCQM
When you begin the process of implementing a new eCQM it’s extremely important to have the correct people involved in the implementation process. This is a PC measure so it will help you if you get representatives from your OB unit who understand how the workflow goes and who understand the documentation process. Get their input as well as clinician input so that you implement this measure in a way that works for them.
2020 ORYX® Requirements
As a quick reminder, for your 2020 ORYX® eCQM requirements, you must select four of the 10 available eCQMs and submit one quarter’s worth of data.
List of eCQM measures available
- VTE-1
- VTE-2
- STK-2
- STK-3
- STK-5
- STK-6
- ED-2
- PC-01
- PC-02
- PC-05
Note: This list differs from the CMS list for the Inpatient Quality Reporting program. CMS has retired PC-01 and has not adopted PC-02. This means that going forward TJC will be maintaining PC-01 and PC-02. So, all of the measure info will be available on the TJC website not on eCQI or CMS websites which is where you are used to finding that information.
Understanding the ePC-02 Specification
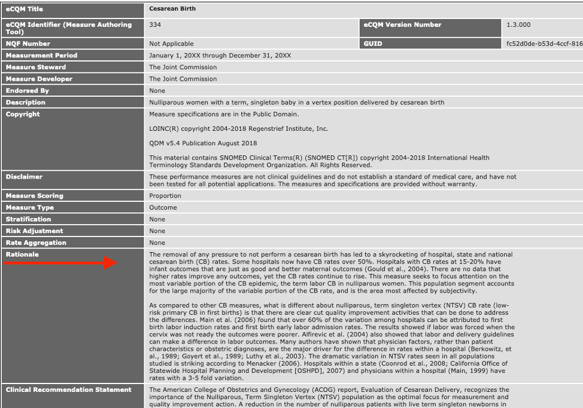
When I read the specification, I always start with the rationale and guidance and in this case, I think the rationale helps you to understand why you would want to implement this measure. It provides you with a good explanation that you can share with your team.
Here’s the specification. I suggest you follow along with the HTML version as you read.
We are going to start at the top of the spec sheet with the Rationale.
The Rationale in Layman’s Terms
There’s been a significant increase in Cesarean Births (CB). Some hospitals have CB rates over 50%. Most of the variation in rates among hospitals is related to first birth labor induction and first birth early labor admission rates.
CMS believes that a reduction in the number of cesarean births will increase patient safety, provide a substantial decrease in maternal and neonatal morbidity and provide a substantial savings in health care costs.
This eCQM is not just a “check the box” measure. There are real quality improvement reasons to implement this measure not just to submit it and meet your eCQM requirements. In my opinion, if you’re going to implement this measure you may as well implement it in a way that’s going to be successful so that you can use those rates internally to make some improvements at your facility.
Reading an eCQM Specification
At the top of the specification are the things I mentioned before, like rationale and guidance, but it’s the bottom of the spec that’s important for you to understand. The bottom of the spec is the logic section which contains the Population Criteria, Definitions, Terminology and Data Criteria (QRD Data Elements). This can appear overwhelming and confusing at first but it’s quite logical if you follow along. And for anyone who is used to reading specs in the old language, remember that we moved over to the CQL language now which is different.
Understanding the eCQM Specification Logic
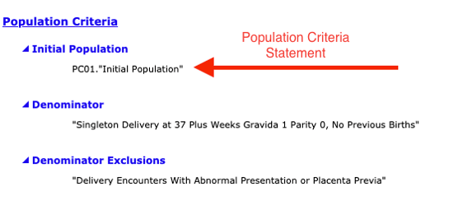
To understand the logic, you first read the population criteria statement(s). Then scroll down and find the definitions for all of the statements found in those population criteria groups.
For example, to understand who are defined in the “Initial Population” population criteria section, read the statement under “Initial Population.” In this case it says “PC01.Initial Population.”
You then go to the Definitions section and locate the definition for “PC01.Initial Population.” This points you to another definition “Delivery Encounter with Age Range,” which you follow to yet another definition. Confused yet?
Every line in here has at least one or more data element(s) that must be captured for the measure. If you are working with a vendor like Medisolv we help translate these specifications, so it relieves some of the workload.
Mapping eCQMs Using the Data Elements
At the very bottom of the spec is the Data Criteria (QDM Data Elements) section which contains the value sets you’ll need to map in order to properly capture those data elements found in the definitions section. At the end of each bullet you’ll see a long string of numbers. These are OID codes which are used to look up the value sets on the VSAC website. Those value sets provide you the codes you need to map in order to capture that particular data element.
A Review of the Population Criteria for PC-02
You’re probably a little confused. Here, I’ve simplified the logic from what we looked at above and listed the populations with just the significant data elements that you need to consider as you are setting up the PC-02 measure.
The first thing to know is that this is an inverse measure. You want a low performance rate. You do not want people in your numerator.
Let’s start with the Initial Patient Population which contains the first group of patients that qualify for the measure.
Initial Patient Population
Layman’s description: To get into the Initial Patient Population (IPP) the person must be an inpatient with a delivery procedure with a discharge date within that time frame. Their age has to be greater than or equal to eight years old and less than 65 years old and their length of stay less than or equal to 120 days.
Simplified logic:
- Inpatient encounter with delivery procedure
- Age >=8 years and <65
- LOS <= 120 days
Once those patients are captured within that population, we then look to see who makes it into the next patient criteria – the Denominator.
Denominator
Layman’s description: To get into the Denominator the person is in the IPP and has a single live birth where their gestational age is greater than or equal to 37 weeks and they must have one of the following: they need Gravida of 1 or a Parity of 0 or they have to have both a history of pre-term birth is equal to 0 and a history of term birth is equal to 0.
Simplified logic:
- Single live birth and
- Gestational age >= 37 weeks (documentation 1 day or less before or concurrent with time of delivery) and
- Gravida = 1 (documentation 42 weeks or less before time of delivery)
- Parity = 0 (documentation 42 weeks or less before time of delivery)
- History pre-term births = 0 (documentation 42 weeks or less before time of delivery) and
- History term births = 0 (documentation 42 weeks or less before time of delivery)
From this group of Denominator patients, we want to see if any of them will be moved into the Exclusion population.
Exclusions
Layman’s description: Once patients enter into the Denominator population, they may be put into the Exclusion population if they have an abnormal presentation or placenta previa.
Simplified logic:- Abnormal presentation
- Placenta previa
Numerator
Layman’s description: Anyone who made it into the Numerator was not excluded and had a cesarean birth.
Simplified logic:- Cesarean birth
The rate is then calculated off of those populations.
Setting up the ePC-02 Workflow
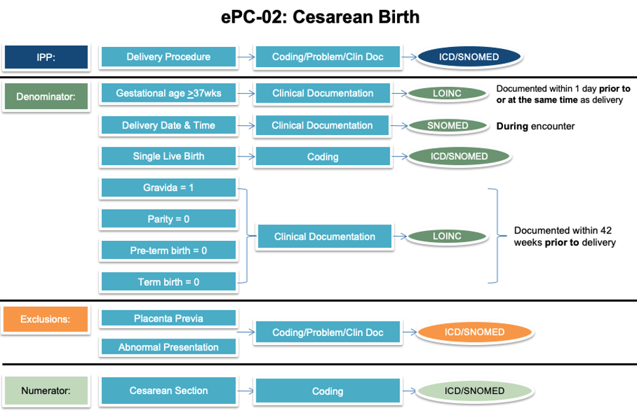
Once you’ve pulled apart the specification the next step is to do a current state analysis of where these items are being captured in your current EHR set up. I find that a workflow graphic like the one I’ve provided below is helpful as you do this process.
You’ll see (from left to right) I listed the different populations followed by the population criteria statement(s), then an educated guess for where that documentation may be found in your EHR and then the type of codes you’ll need to map to capture that element.
As you look at each population criteria statement fill in the information for your specific organization.
- Do you capture this information?
- If not, what is the best way to capture the information going forward?
- If so, where do you currently capture this information?
- Will you need to make any changes to documentation processes?
- Are you capturing it in multiple places?
- If so, which documentation will give you the best results that are within the timing restrictions?
Once Set Up Validate
Once you have the measure set up in your system you can begin the validation process. Initially this process may take some time as you will be trying to resolve technical errors and problems with workflows, but after the kinks are worked out you can begin the real work of quality improvement.
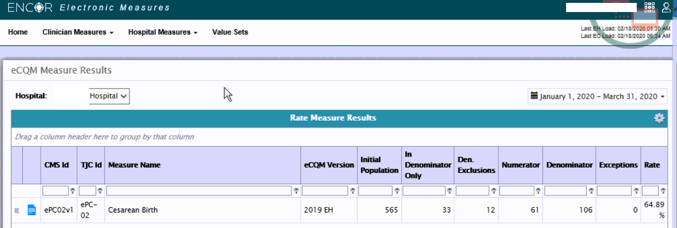
Here is a screenshot of one of our client’s rates. Just for context, this client just implemented this measure at the beginning of February which, at the time this blog was written, was only a few weeks ago. They are working on moving past the initial validation phase and into the quality improvement phase. Note how the populations match against the review we just did above.
Other Things to Consider
Timing is Tricky
With each of these data elements the timing of this documentation is extremely significant for the accuracy of your results. For instance, gestational age must be documented within one day prior to or at the same time as delivery. If it’s outside of that window, that gestational age is not going to be captured correctly and those patients are going to fall out of the Denominator.
With this measure in particular there are several types of timing statements that you must adhere to such as:
- time of delivery
- relevant period
- author date time (timeOfDelivery.authorDatetime)
- at delivery
- Author Date Time 42 weeks or less before
- Author Date Time 1 day or less before or on
What I did for our clients was to pull together the timing requirements for every data element in this measure so we can easily say, “oh it’s Gravida and with Gravida it needs to be done at this time.” I suggest doing something along those lines if you are not a Medisolv client.
Value Sets Differ Between PC Measures
As you look through the data elements you may see some terms you think you are familiar with if you are capturing the other PC measures, but be careful. Value sets differ between the PC measures. For instance, for PC-01 and PC-02 the value set is called Estimated Gestational Age at Delivery but for PC-05 it’s called Gestational Age at Birth and it’s different. There is no overlap. So, if you’re doing all three of those measures you will need to figure out how to map more than one code to your gestational age documentation.
Don’t Skip the Education and Feedback Part
Continual education and feedback are important to the ultimate success of an eCQM at your organization. From my experience, the hospitals we work with who have the most eCQM success are those that have established processes for educating their clinicians. They educate not just on “why we are capturing this measure” but also on the documentation and workflow set up.
Also see: Using Behavioral Psychology to Improve Physician Compliance
I also suggest you implement a process for clinicians to provide feedback on what works and what doesn’t work.
And finally, I believe you should share the results. Our clients often share with their teams a dashboard with their results on a regular basis. As you work the measure and rates begin to improve you want to celebrate their accomplishments.
The PC measures have been a challenge in the past because of the specificity of the documentation particularly as it relates to timing. If you decide to implement it, don’t give up if it’s difficult. Give it some time and work through it. You will get there.
Get Ahead and Improve Your QualityMedisolv Can Help We've seen some big changes in The Joint Commission’s ORYX® program so far in 2020. With Medisolv as your partner we help guide you through every new change along the way. Talk with us about how we can help you track and improve your quality performance on measures like ePC-02! Here are some additional resources you may find useful.
|



.png?width=352&name=2026%20Quality%20Reporting%20Deadlines%20Guide%20(1).png)


Comments